Tuesday, July 13, 2021

Types of pencils- Unraveling the Enigma of Pencil sketching

Types of Graphite Pencils

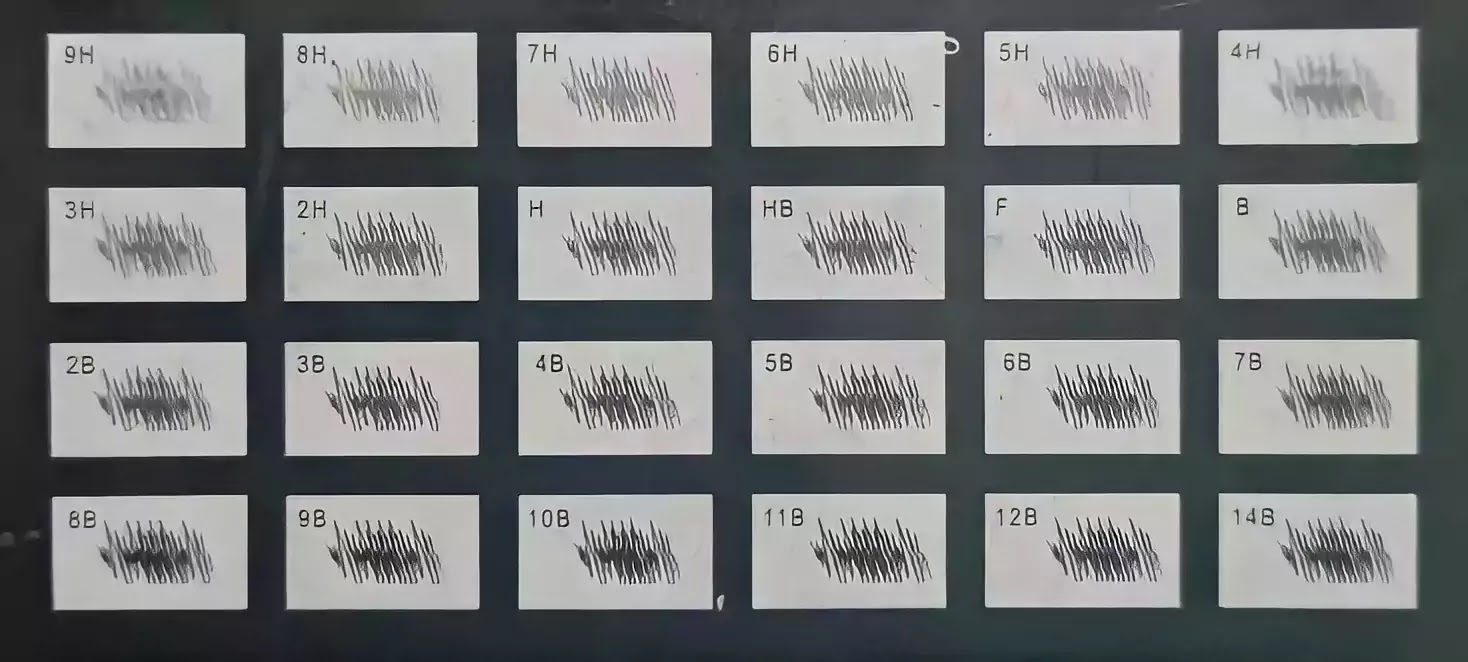
There are total 24 different types of graphite pencil for sketching.All pencils types are of graphite pencils which is represented in the following image:-

Graphite Pencil

  • 9H
This grade of pencil is the lightest as compared to all the other grades of graphite pencils.
  • 8H, 7H, 6H,
These grades of pencils can be used as a substitute of 9H pencil to shade the lightest part in any sketch as first layer of the face or any lightest part.
These grades of pencils are mostly used to shade the first layer of face for the lightest shading.
These grades of pencils are used for drawing a second layer to the sketch a little darker than 4H.
These grades of pencils are used for drawing a third layer to the sketch which is a little darker than HB.
These grades of pencils are used to draw the pupil of the eye and any other darker parts required to draw layer by layer like clothes, Hair etc.
These grades of pencils are used to draw next layer of drawing hairs or a darker cloth.
  • 7B, 8B graphite pencil, 9B, 10B
These grades of pencils are used to draw the third layer of drawing a hair or a cloth.

These grades of pencils are the darkest compared to all the previous grades of graphite pencils.

HB Pencil Drawing

Best Sketching Pencils

There are no such pencils which are best the only thing to take in mind is regular practice to develop your skills. High skills in sketching gives you idea that a sketch can be drawn more realistic with any kind of pencils from the cheapest one the highly costing pencils. For further information my views are that Staedtler drawing pencils and Faber Castell drawing pencils/Faber Castell Graphite pencils are the best brand to use for sketching but if you are a beginner then you should start with the cheapest pencils whichever fits to your budget.

Labels: , ,

Saturday, July 3, 2021

Simple Guide of Sketching : Tips for newcomers

Art Tutorials - How many items for sketch & How to sketch?

Welcome to the Ultimate Artists blog. In this blog we are gonna show you to learn pencil sketching for beginnerssome sketches and the steps to draw them with graphite pencils and also some sceneries with oil pastel colours. The art tools which should be there if you started a commission work and want your customers to be more satisfied and also we will talk about What are the guide for drawing realistic people?

Graphite Pencil Sketch

  • Different Types of Graphite Pencils
The first thing for a sketch is a pencil of different shades from lightest grade to the darkest one. For drawing yo should buy graphite pencils for shading the face area or clothes. To make your sketch more unique and realistic you should use sharp edged pencils because it gives the sketch more finite lines and is easy for you to draw outlines,  do light and dark shading without having some darker lines in lightest area. 

  • Art Blending Stumps or Tissue paper
If you have blending stump then you can use it but if you do not have Blending Stumps then you can use Tissue paper for blending it will give your sketch more smoother effect. And if you are a beginner then I prefer you to use Tissue paper. And if you want to use this you should learn how to use it in your sketch so that you can give your sketch more eye catchy look. 

  • Mono Zero Eraser Pen
For detailing in your sketch you should use Mono zero eraser which gives more attractive look to your sketch. If you are a beginner then you should not use this in starting because in starting you are at learning stage and if your sketch looks realistic and hyper realistic then it requires more minute detailings to be done to make it look attractive and which gives you satisfaction for your work you done and the time you invested for your sketch.

  • A4 Drawing Sheet 
The most important thing is sheets on which you should be drawing your sketch. If you are a beginner then you should buy A4 Drawing Sheet which you can buy from a normal stationery shop. There are 2 types of sheet :-1) Smoother one , 2) Rough one
The smoother one requires less work rather than the rough one, rough paper requires more work and time to make a sketch look more eye catchy. If you are beginner then you should use smooth A4 Drawing Sheet to start learning.

My Favourite Art
  • Reference Pictures for Artists
If you are a beginner and can't understand about the lighting areas from coloured reference images then you should opt for a Reference Pictures for Artists. Firstly make your reference images turn from coloured images to a black & white images. This will help you to know the darkest areas to shade and also make them realistic by practising daily.

By using printout method you will learn to draw sketches more realistic so quickly if you do regular practice.The printout image should be black and white because it will also help you to learn the light and dark areas to draw realism in your sketches.Printout images helps your sketching technique to be improved more quickly.If it doesn't did anything in the initial stage then don't lose any hope just do regular practice to get improvisation in sketches because you can't make your sketch as real as an high level artist in your first attempt so, do regular practice to get good results in your sketches.

Artworks using Reference images


Here are some Steps to learn How to draw sketches - Lin Yi face drawing tutorial
  • Step 1
At first you should start practising with drawing straight lines regularly to give your sketch more finite lines and more realistic and eye catchy look which will give you more satisfaction. With this straight lines you should also practice drawing some curly lines which will help you to draw long hairs texture more realistic and more finite that it looks completely same with the hairs of a person you are drawing as commissioned work. 

  • Step 2
While practising of drawing straight lines you should also practice shading. While learning how to shade you should learn from lightest shading to the darkest shading. Shading should be as much clear that the shades should be smoother and no extra dark lines are seen so, that it will help you to shade the face more realistically. The dark shading will help you to draw clothes.

Graphite Artwork
  • Step 3
After learning lightest darkest shading you should start practising with drawing some 3D objects which will help you in learning both the above steps more clearly. If the objects shading didn't give you that satisfaction that it should more realistic then you should practice more and more so that you will completely learn to draw fine lines, Realistic and smoother shading and give your sketch a 3D look.

This blog will help you to learn easy sketching for beginners in some easy steps.


Labels: , , , , , , , , ,

Friday, July 2, 2021

Everything You've Ever Wanted to Know About Basic Sketching Tips : Improve Your Sketches Quality

These are Some important tips while drawing face

Sketching Tips

No one's perfect in this world so,if you are making any of your sketches and your art work doesn't satisfy you then don't lose hope it's just a beginning for you. In this blog I have provided you with some basic sketching tips to improve your sketches quality so, to get the implementation on your sketch just follow these steps to get the best quality in your sketches. These tips of sketching are as follows
  • Quick Sketching Techniques
The first thing to do before making a sketch is to use grid method in every sketches. This method will help you to draw the outlines of your sketches so, accurately only if you practice sketching daily and also practising drawing straight and curly lines which is a step to towards making a realistic sketch which I wrote about in my previous post so if you haven't seen that then go and follow the steps to practice sketching daily.
  • Reference Pictures for Artists
If you are a beginner and can't understand about the lighting areas from coloured reference images then you should opt for a Black & white reference images. Firstly make your reference images turn from coloured images to a black & white images. This will help you to know the darkest areas to shade and also make them realistic by practising daily.
  • Good Quality Pictures
If you are a beginner and starting commission work then you should ask you client for more cleared images. Blurry images will lead to shading error. Clear images will make you know the correct area, where to shade light or dark.
  • Ivory Color Sheets
If you are drawing a sketch for the First time and don't know which type of pages should be fine to draw sketches.
The paper which you are opting should be smoother one so, that your sketch will have more realistic shadings. You should use Ivory paper if you are learning to draw sketch and when you have learnt that much sketching which makes you feel more satisfied after drawing your sketch then you should purchase a set of A4 size or A3 size sheets of Brustro.
  • Cleaning the surface before making sketches
Before starting to draw any sketch you make sure that the surface you are using on which you have putted you sheet for sketching is clean or not because clean surface didn't create any mess in your sketches while a surface with some minute particles left on it makes a huge impact on your sketch while shading any area of your sketch. While shading if the surface is not clean then you can see the darker dots of that minute particle appearing on your sketch, making your sketch with no clear finishing and also makes you and your client unsatisfied.
  • Reference Pictures for Drawing
The Best method for a beginner to learn sketch is by using a printout of reference images. If you are planning to start learning sketch and feels like by using images from mobiles you can't even match the outlines of your sketch then you should opt for a printout of your reference pic it would be more helpful for you to configure the image and match outlines of your sketch as to the reference image. The First attempt to make a sketch will not satisfy you as you wanted to be but if you do regular practice and give 2-3 hrs to sketching then it will improve your skills in sketching and you will get the desired output on your sketches which will make you more satisfied.
  • Final sketching tips
At last while making a sketch you should have more patience because without patience a sketch can be made but can't give you the level of satisfaction you want instead it will give you disappointment. So, while making any sketch if you are losing your patience then just take a break and just relax for sometime and if you think you are ready then only start making your sketch. Sketches needs greater time to be drawn so, don't be in a hurry just draw slowly and carefully with a view to draw minute details very much realistic and more synonymous to reference image. 

Labels: , , , , , ,

Reference Pictures for Drawing

Reference Pictures for Drawing

The Best method for a beginner to learn sketch is by using a printout of reference images. If you are planning to start learning sketch and feels like by using images from mobiles you can't even match the outlines of your sketch then you should opt for a printout of your reference pic it would be more helpful for you to configure the image and match outlines of your sketch as to the reference image. The First attempt to make a sketch will not satisfy you as you wanted to be but if you do regular practice and give 2-3 hrs to sketching then you will get the desired output as you wanted in your sketches.

A printout of reference images should be used if you are a beginner in sketching field because it helps you draw more accurately.First you should draw grid on the printout sheet and then draw grids on the sheet you are using to draw.The grid on the sheet you are using to draw should be as same as the grid on the printout image because it will help you to draw the outlines of the sketches more efficiently and more accurately.

By using printout method you will learn to draw sketches more realistic so quickly if you do regular practice.The printout image should be black and white because it will also help you to learn the light and dark areas to draw realism in your sketches.Printout images helps your sketching technique to be improved more quickly.If it doesn't did anything in the initial stage then don't lose any hope just do regular practice to get improvisation in sketches because you can't make your sketch as real as an high level artist in your first attempt so, do regular practice to get good results in your sketches.

Labels: ,

Cleaning the surface before making sketches

A must to do before making sketches

Before starting to draw any sketch you make sure that the surface you are using on which you have putted you sheet for sketching is clean or not because clean surface didn't create any mess in your sketches while a surface with some minute particles left on it makes a huge impact on your sketch while shading any area of your sketch. While shading if the surface is not clean then you can see the darker dots of that minute particle appearing on your sketch, making your sketch with no clear finishing and also makes you and your client unsatisfied.

Labels: ,

Ivory Color Sheets

Ivory Sheets to make sketches

If you are drawing a sketch for the First time and don't know which type of pages should be fine to draw sketches.

The paper which you are opting should be smoother one so, that your sketch will have more realistic shadings. You should use Ivory paper if you are learning to draw sketch and when you have learnt that much sketching which makes you feel more satisfied after drawing your sketch then you should purchase a set of A4 size or A3 size sheets of Brustro.

Labels: ,

Quick Sketching Techniques

How do you create a self-portrait that accurately depicts who you are without drawing your face or using words?

Quick Sketching Techniques

No one's perfect in this world so, your sketch doesn't satisfy you then don't lose hope it's just a beginning for you. The first thing to do before making a sketch is to use grid method in every sketches. This method will help you to draw the outlines of your sketches so, accurately only if you practice sketching daily and also practising drawing straight and curly lines which is a step to towards making a realistic sketch which I wrote about in my previous post so if you haven't seen that then go and follow the steps to practice sketching daily. 

A printout of reference images should be used if you are a beginner in sketching field because it helps you draw more accurately.First you should draw grid on the printout sheet and then draw grids on the sheet you are using to draw.The grid on the sheet you are using to draw should be as same as the grid on the printout image because it will help you to draw the outlines of the sketches more efficiently and more accurately.

Labels: ,

A4 Drawing Sheet

Sheets requirement

The most important thing is sheets on which you should be drawing your sketch. If you are a beginner then you should buy A4 Drawing Sheet which you can buy from a normal stationery shop. There are 2 types of sheet :-
  1. Smoother one
  2. Rough one

The smoother one requires less work rather than the rough one, rough paper requires more work and time to make a sketch look more eye catchy. If you are beginner then you should use smooth A4 Drawing Sheet to start learning.

If you are drawing a sketch for the First time and don't know which type of pages should be fine to draw sketches.
The paper which you are opting should be smoother one so, that your sketch will have more realistic shadings. You should use Ivory paper if you are learning to draw sketch and when you have learnt that much sketching which makes you feel more satisfied after drawing your sketch then you should purchase a set of A4 Drawing Sheet or A3 Sketch Paper of Brustro.

Labels: , , ,

Mono Zero Eraser Pen

Some of the Must to have Erasing tools

For detailing in your sketch you should use Mono zero eraser pen which gives more attractive look to your sketch. If you are a beginner then you should not use this in starting because in starting you are at learning stage and if your sketch looks realistic and hyper realistic then it requires more minute detailings to be done to make it look attractive and which gives you satisfaction for your work you done and the time you invested for your sketch.

Best brand

The best brand you can use is Tombow mono zero eraser/ Tombow mono eraser/ Tombow eraser. You will get a tombow mono zero eraser refill with it which you can use for minute detailing in sketches.

Labels: , , , , ,

Artist's Blending Stump

Some Blending tools

If you have art blending stump then you can use it but if you do not have Art Blending Stumps then you can use Tissue paper for blending it will give your sketch more smoother effect. And if you are a beginner then I prefer you to use Tissue paper. And if you want to use this you should learn how to use it in your sketch so that you can give your sketch more eye catchy look. 

After drawing an outline of the sketch you should give a first layer shading which is the smoother shading.After shading the first layer before going to any layer of shading you should check if the pencil is sharpened or not and after checking you should go for the next layer. The next layer should be drawn little bit darker than the smoother one according to the reference image and then after each layer of shading you should blend them with a tissue or a blending stump .While blending for the face texture you should use a tissue paper because it makes the texture of the face more smoother and look realistic.

Labels: , , , ,

How to Outsmart Your Peers on Sketching Pencils Guide

Pencil Sketch Art: It's Not as Difficult as You Think -Best Pencil for Sketching/ Sketching Pencils


Pencil sketching might feel a bit scary at first, but it’s actually not as hard as you think. With the right pencils, some basic techniques, and a bit of practice, anyone can create beautiful, realistic sketches. Whether you’re a beginner doodling portraits or an intermediate artist shading landscapes, this complete sketching pencils guide will help you every step of the way. We’ll discuss the best pencils for sketching, techniques for light and dark shading, blending tips, and expert tricks to enhance your art. Let’s grab a pencil and get started!

Why Choose the Right Sketching Pencils?

The key to a great sketch is your choice of pencil. Not all pencils are the same. Graphite pencils vary in hardness, which affects how dark the lines are and how easily they can be erased. Softer pencils (like 6B or 8B) create bold, dark shades that are perfect for dramatic effects, while harder pencils (like H or 2H) give lighter, precise lines for outlines.

Best Pencils for Sketching:
  • Graphite Pencils Set (Recommended Starter Kit): Get a range from 9H (very light) to 9B (very dark). Brands like Staedtler Mars Lumograph or Faber-Castell Gripped are affordable and resistant to smudging.
  • Charcoal Pencils: Great for drawing hair, fur, or deep shadows. Try General's Compressed Charcoal or Derwent Charcoal Pencils—they can be messier but are excellent for creating texture.
  • Mechanical Pencils (0.5mm or 0.7mm): Perfect for fine details without needing to sharpen often. Use HB lead for everyday sketching.
Pro Tip: Get a set of 12-20 pencils ranging from H to B grades. This will ensure you have the right options for all your shading needs without any gaps in your selection.

Essential Sketching Pencils and Their Uses

Your first step is to stock up on pencils in different shades, from the lightest grade (like 4H) to the darkest (8B or charcoal). Graphite pencils work well for shading faces, clothes, or objects, allowing you to build realistic depth layer by layer.

  • Use sharp-edged pencils (freshly sharpened) for fine lines, outlines, light shading, and dark accents. They help avoid unwanted dark smudges in light areas.
  • Charcoal pencils are great for hair texture or the darkest parts. Start with them for heavy shading—if you overlay charcoal on graphite, it won’t darken much and can be frustrating. Always begin dark areas with charcoal if that’s your aim.
For example, when drawing a portrait, outline the face with a 2H graphite pencil, shade the skin with 2B-4B, and add hair highlights with charcoal for a gritty, realistic look.

Mastering Light and Shadow: The Key to Realistic Sketches

To make any sketch believable, start by studying the light source. Find out where the light reflects to determine the light and dark shades. If light hits the right side of a face, the left side will be the darkest—shadows fall opposite the light.

Quick Light Reference Guide:
  1. Top Lighting: Creates strong shadows under the chin.
  2. Side Lighting: One side of the face is lit while the other is in shadow (great for dramatic portraits).
  3. Front Lighting: Overall soft light, with minimal harsh darks.
This principle applies to everything—from human faces to still life. Try sketching a sphere: shade one side dark and blend toward the light for an immediate 3D effect.

Step-by-Step Shading Process for Beginners

Once you’ve outlined (keep it light with a 2H pencil for easy erasing), patiently build layers. Here’s a reliable process:
  1. Outline Lightly: Use an H or 2H pencil. Press gently—dark outlines ruin realism and are hard to erase without damaging the paper.
  2. First Layer (Smooth Shading): Use even, light strokes with a 2B pencil. Cover the whole area gently.
  3. Sharpen Before Adding Layers: Always check your pencil point. Dull tips create uneven shades.
  4. Build Darker Layers: Gradually go darker (4B, 6B) to match your reference photo. Focus on the mid-tones first.
  5. Blend After Each Layer: Use tissue paper for faces (to create smooth skin) or blending stumps for hair and clothing (for textured realism).
Repeat until your sketch resembles the reference. Patience is crucial; rushing will lead to poor results.

Advanced Pencil Sketch Techniques for Realistic Results

To take your sketches to the next level, learn these simple and advanced techniques. They’ll make your art look professional without needing fancy tools.

Technique 1: Pencil Grip for Light vs. Dark Shading
  • Light Areas: Hold the pencil at the back end (far from the tip). Move side to side for light, feathery tones.
  • Dark Areas: Grip near the tip like a needle. Press down firmly for bold, controlled darkness.
  • Practice on scrap paper by creating a gradient from light to dark in one stroke.
Technique 2: Cross-Hatching and Scumbling
  • Cross-Hatching: Layer intersecting lines for texture (great for fabric or bark).
  • Scumbling: Use circular, scribbly strokes for soft skin or fur. Build gradually for depth.
Technique 3: Negative Drawing
  • Draw shadows around light areas instead of the objects themselves. This easily creates sharp edges.
Technique 4: Using an Eraser as a Tool
  • Use a kneaded eraser to "draw" highlights—lift graphite for shiny eyes or reflective metal.
Blending Must-Know Tips:
  • Use tissue paper for faces and smooth gradients.
  • A blending stump or tortillon works for details like eyelashes.
  • Use a cotton swab for quick fixes on larger areas.
  • Avoid your finger—oils will smudge and discolor.
Common Mistakes to Avoid in Pencil Sketching

Even experienced artists can make mistakes. Be careful of these:
  • Overworking the Paper: Too many layers can tear it. Stop at 4-5 blends.
  • Ignoring Proportions: Measure with your pencil (hold it at arm's length).
  • Flat Shading: Always vary pressure—avoid uniform gray.
  • Wrong Pencil Order: Start with charcoal for darks, as mentioned earlier.
  • No Reference: Use photos instead of relying on imagination for realism.
To improve: Step back every 10 minutes to compare with your reference.

Recommended Materials Beyond Pencils
  • Paper: Use smooth Bristol or an 80-100gsm sketchbook to avoid bleed-through.
  • Erasers: Get both kneaded and vinyl for precision.
  • Fixative Spray: Helps lock in your artwork (use after completion).
  • Budget Starter Kit (Under ₹500): A Faber-Castell graphite set, a tissue pack, and a basic sketchbook.
Practice Drills to Improve Fast
  1. Daily 10-Minute Gradients: Practice shading from black to white.
  2. Portrait Challenges: Copy celebrity photos (start simple, like Rajpal Yadav’s expressive face).
  3. Object Studies: Sketch everyday items under lamp light.
  4. Timed Sketches: Spend 30 seconds on outlines and 5 minutes on full shading.
Keep track of your progress in a sketchbook—you'll notice big improvements in weeks!

Final Thoughts: Start Sketching Today!

Pencil sketch art is accessible and rewarding. Grab your pencils, choose a reference, and start experimenting. With the right sketching pencils guide (from light to dark graphite and charcoal), consistent layering, and blending, your sketches will impress. Remember, it’s all about practice, not striving for perfection.

What’s your next sketch project? Share in the comments—I’d love to hear! 
Labels: , , , , ,